


Replastering a Period Home Is Not Like Skimming a New Build
Replastering a period home in Gloucestershire is a different beast entirely from freshening up a modern property. The walls behave differently. The materials must be different. The timelines stretch longer. And the costs reflect the specialist skills and traditional materials required to do the job properly.
Gloucestershire is home to some of England’s finest period architecture. From Regency terraces in Cheltenham to honey coloured Cotswold stone farmhouses, these buildings were constructed with lime mortar, lath and plaster, and solid masonry. They were designed to breathe. Any replastering work must respect that original design philosophy or risk causing serious structural damage.
This guide covers every stage of the process, from initial assessment through to final decoration. You will know what questions to ask, what costs to budget for, and how long each phase realistically takes.
Stage 1: Property Assessment and Survey (Week 1)
Every successful replastering project starts with a thorough inspection. A specialist plasterer will visit your property to assess:
- Wall construction: Is it solid stone, timber frame, brick, or a combination? Each substrate requires a different approach and plaster specification.
- Existing plaster condition: Has previous work used incompatible materials? Cement render over Cotswold stone is a common problem that traps moisture and accelerates decay.
- Moisture levels: Damp readings identify whether rising damp, penetrating damp, or condensation is present. These issues must be resolved before any new plaster goes on.
- Listed building status: If your property is Grade I or Grade II listed, you may need Listed Building Consent before making changes to internal or external plaster finishes.
This assessment typically takes half a day for a standard property. For larger or more complex homes, a full day may be needed. Expect to receive a detailed written report and itemised quotation within a week of the visit.
Cost: Most reputable plasterers offer free assessments. Some specialists charge a survey fee of £100 to £250, which may be deducted from the final project cost.
Stage 2: Planning and Material Specification (Week 2)
Once the assessment is complete, your plasterer will specify the materials and methods for your project.
For period homes in Gloucestershire, lime plaster is almost always the correct choice. The two main options are:
- Lime putty plaster: The most traditional option. Made from slaked lime and aggregate, it offers excellent breathability and a soft, authentic finish. Curing time is longer, but the results are superior for internal work on heritage properties.
- Natural Hydraulic Lime (NHL): Sets through a chemical reaction with water, making it suitable for external render and areas exposed to moisture. NHL comes in different strengths (NHL 2, 3.5, and 5), with softer grades used for older, more delicate substrates.
Your plasterer should explain exactly why they have chosen a specific lime for your project. The wrong strength can cause as many problems as the wrong material. A hard NHL 5 render on soft Cotswold limestone, for example, will cause the stone to deteriorate faster than the render itself.
For a deeper comparison of traditional and modern materials, see our guide on lime plaster versus gypsum plaster.
Stage 3: Preparation Works (Weeks 2 to 3)
Preparation is where most of the hard graft happens, and where cutting corners causes the biggest problems downstream.
Removing old plaster: If the existing plaster is incompatible (cement or gypsum on a building that needs lime), it must come off completely. This is dusty, noisy work. Expect the team to protect floors, seal doorways, and manage waste removal with skips.
Treating the substrate: Once the walls are stripped back to the original stone or brick, the plasterer will assess the exposed surface. Loose mortar joints may need raking out and repointing with lime mortar. Damaged laths on timber framed sections may need replacing with new riven or sawn lath, fixed with stainless steel nails.
Addressing damp: Any moisture issues must be resolved before new plaster is applied. This might involve improving drainage, fitting a French drain, repairing gutters, or simply allowing walls to dry out naturally after removing impermeable cement render.
Cost and timeline: Preparation typically accounts for 30 to 40 per cent of the total project cost. For a three bedroom period property, expect one to two weeks of preparation work, depending on the condition of the existing walls.
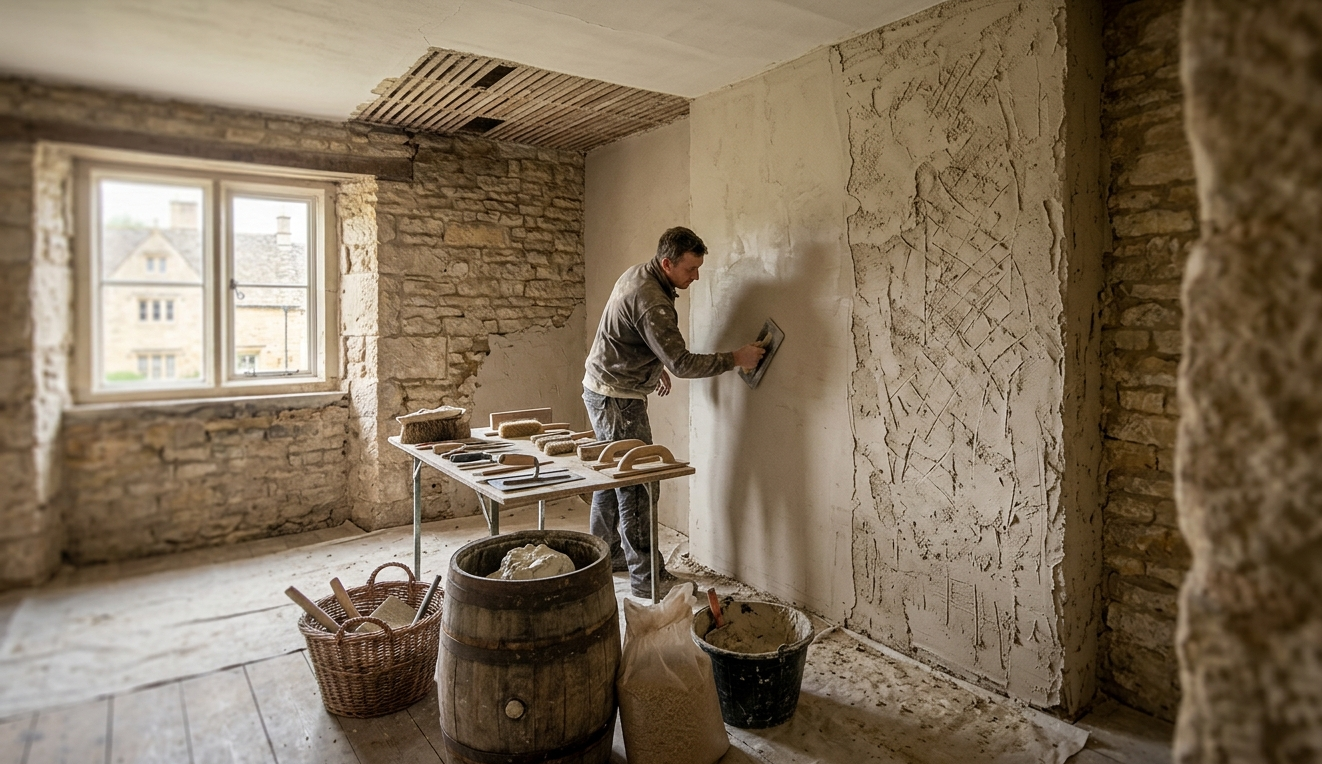
Stage 4: Plaster Application (Weeks 3 to 8)
This is the stage most homeowners picture when they think of replastering. But for a lime plaster job, it takes significantly longer than a modern gypsum skim.
The three coat system:
Traditional lime plastering uses a three coat application:
- Scratch coat (harling or render coat): The first coat bonds to the substrate and provides a key for subsequent layers. It is applied at roughly 10 to 12mm thickness and scored with a scratching tool to create grip. This coat must cure for a minimum of seven days before the next coat is applied.
- Float coat (straightening coat): This coat builds thickness and creates a flat, true surface. Applied at 8 to 10mm, it is floated level using a darby and straight edge. Another seven day minimum curing period follows.
- Finish coat (setting coat): The final coat is applied at 3 to 5mm and trowelled to a smooth or textured finish depending on the desired aesthetic. This coat also needs proper curing time.
Curing is not optional. Lime plaster cures through carbonation, a slow process where the lime reabsorbs carbon dioxide from the air. Rushing this process by applying heat, closing windows, or applying the next coat too soon leads to cracking, poor adhesion, and premature failure.
Timeline: For a single room, expect two to four weeks from scratch coat to finished surface. For a whole house, the project can run eight to twelve weeks, depending on the number of rooms and whether internal and external work runs simultaneously.
Cost per square metre:
| Work Type | Cost per m² |
| Internal lime plaster (3 coat system) | £50 to £100 |
| External lime render (NHL based) | £60 to £120 |
| Modern gypsum skim (for comparison) | £25 to £50 |
| Decorative lime finish (polished or textured) | £80 to £150 |
These figures reflect Cheltenham and Gloucestershire rates in 2026. Prices vary based on access difficulty, ceiling height, and the complexity of architectural details.
For a full pricing breakdown, see our cost of plastering services guide.
Stage 5: Drying and Decoration (Weeks 8 to 12)
After the final coat is applied, patience is essential.
Drying times: Lime plaster takes considerably longer to dry than modern alternatives. As a general rule, allow one week of drying time per millimetre of plaster thickness. A three coat system at 25mm total thickness needs roughly four to six weeks before decoration.
Signs the plaster is ready: The surface changes from a dark, damp appearance to a consistent light colour across the entire wall. Any dark patches indicate residual moisture. Do not paint or paper over damp plaster.
Choosing the right paint: Standard vinyl emulsion is not suitable for lime plaster. It creates an impermeable film that blocks the very breathability you have invested in. Use breathable paint systems such as limewash, mineral paint, or specialist breathable emulsion designed for use on lime substrates.
Wallpaper: If you want wallpaper on lime plastered walls, use a breathable wallpaper paste and avoid vinyl backed papers. Traditional wheat paste and lining paper work well.
Heritage Plastering’s Approach to Period Property Replastering
Over 15 years of working on period properties across Gloucestershire has taught us that every building has its own personality. A Georgian townhouse in Cheltenham responds differently to a Tudor timber frame in Tewkesbury, and both require different approaches from the same team.
The single biggest lesson from our experience is this: the preparation stage determines the outcome. We have seen countless properties where a previous contractor applied new plaster over inadequately prepared walls. The new plaster looked perfect for six months, then damp patches appeared, cracks opened up, and the homeowner faced a bill twice the size of the original job.
We apply lime plaster in three distinct coats, allowing proper drying time between each layer. We adapt our lime mix depending on the wall type, location, and age of the property. This approach takes longer, but it produces finishes that last for decades, not just years.
Total Project Cost Summary
For a typical three bedroom period property in Gloucestershire requiring full internal replastering with lime:
| Cost Element | Estimated Range |
| Assessment and survey | Free to £250 |
| Preparation and stripping | £2,000 to £5,000 |
| Lime plaster application (internal) | £6,000 to £15,000 |
| External lime render (one to two elevations) | £4,000 to £10,000 |
| Decoration (breathable paint) | £1,000 to £3,000 |
| Total estimate | £13,000 to £33,000 |
These ranges reflect the significant variation between projects. A cottage needing one room replastered sits at the lower end. A large Georgian property requiring full internal and external work with architectural detailing sits at the upper end.
Frequently Asked Questions
Can I live in my home during replastering?
Yes, in most cases. Work proceeds room by room, allowing you to use unaffected areas. However, dust and noise are significant during preparation. Discuss a phased plan with your plasterer to minimise disruption.
How long does the entire replastering process take?
For a full period property, expect eight to sixteen weeks from assessment to final decoration. The biggest variable is curing time between lime plaster coats, which cannot be accelerated without risking quality.
Do I need planning permission to replaster a listed building?
Internal replastering using like for like materials usually does not require consent. However, changing the external render, altering architectural features, or switching materials may need Listed Building Consent. Always check with your local conservation officer.
Why is lime plastering more expensive than modern plastering?
Lime materials cost more than gypsum. Application takes longer due to multi coat systems and curing times. The skill level required is higher. And preparation on period properties is more involved. However, lime plaster lasts longer and protects the building’s structure, making it a sound long term investment.
What happens if damp is discovered during preparation?
A professional plasterer will pause the project, identify the source, and recommend remediation before proceeding. Plastering over damp is never acceptable, regardless of material type.
Moving Forward with Your Gloucestershire Replastering Project
Replastering a period home is an investment in your property’s future. Done correctly with the right materials and an experienced team, the results will last for generations. Done cheaply with incompatible materials, you create problems that cost far more to fix than the original job.
Start with a proper assessment. Understand the materials your home needs. Budget for preparation as well as application. And allow the time that lime plaster requires to cure properly.
The period homes of Gloucestershire deserve craftspeople who understand their construction, respect their history, and deliver work that stands the test of time. Choose your plasterer accordingly.
Get in touch with Heritage Plastering for a free property assessment and tailored quotation for your period home.