


Watching fresh plaster transform from a dark, wet paste into a smooth, solid surface is one of the most satisfying parts of a renovation. But this stage is also the most delicate. If moisture leaves the plaster too quickly or unevenly, fine lines or deep cracks can appear across your new walls. So, how do you stop plaster cracking when drying? Heritage Plastering prioritizes careful environmental control to ensure that every finish remains stable and aesthetically perfect for years to come.
Understanding the science behind how moisture interacts with various substrates is the best way to avoid these common pitfalls. Plastering is a wet trade that relies on a specific chemical and physical bond. When that bond is interrupted by external factors like heat or drafts, the integrity of the finish is compromised. This guide provides actionable steps to manage your room environment and protect your investment during the curing process.
How to stop plaster cracking when drying?
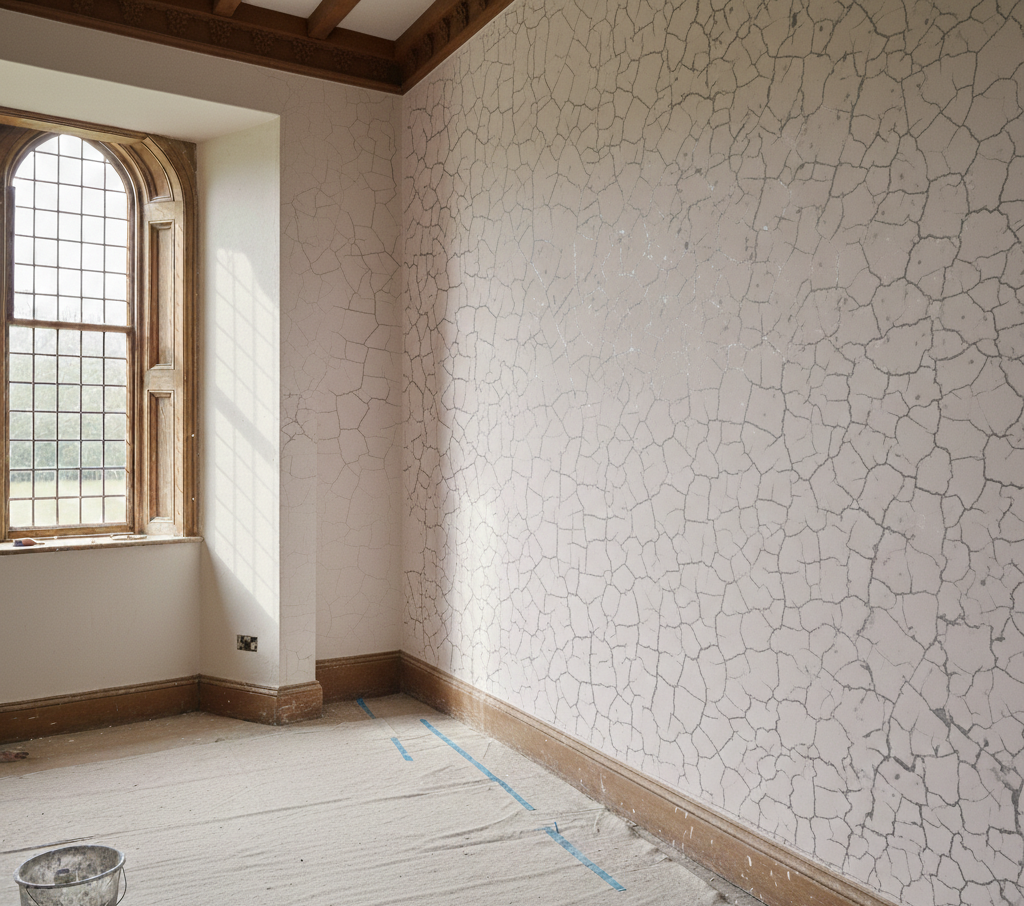
The primary cause of cracks in new plaster is rapid evaporation. When the surface of the wall dries significantly faster than the layer underneath, it creates tension. This tension causes the material to pull apart, resulting in what many call “crazing” or map-cracking. To prevent this, you must resist the urge to use industrial heaters or turn the central heating up high immediately after the work is finished.
Keeping a steady, ambient temperature is the most effective strategy. Aim for a consistent room temperature of around 16 to 18 degrees Celsius. This allows the water to evaporate at a pace that matches the chemical setting time of the plaster. If you are working during a cold winter in Gloucestershire, a very low background heat is better than a sudden blast of warmth which can shock the fresh material.
Airflow is just as important as temperature management. While you need some ventilation to allow the humid air to escape, a direct draft can be just as damaging as a radiator. If a cold wind blows directly onto a wet wall through an open window, that specific section will dry faster than the rest of the room. This uneven drying is a major contributor to localized cracking. Keep windows slightly ajar on the latch rather than wide open.
Managing the “suction” of the original wall is another technical step that happens before the plaster is even applied. If the underlying brickwork or old plaster is exceptionally dry, it will suck the moisture out of the new mix. A professional will always treat the wall with a bonding agent or a water mist to satisfy this thirst. This ensures the new coat stays workable and has enough water to complete its internal chemical reaction.
Preventing shrinkage cracks in plaster
Structural movement is the second most common reason for fractures. New buildings often settle, and older homes can shift slightly with seasonal temperature changes. To mitigate this, many modern projects use an alkaline-resistant mesh at stress points. Placing mesh over the corners of windows and doors provides the tensile strength needed to hold the plaster together if the building experiences minor movement.
For those renovating historic properties lime plaster offers a natural advantage. Lime is more flexible than modern gypsum and can accommodate a small amount of movement without cracking. This is why it remains the gold standard for period homes in Cheltenham and the Cotswolds. The traditional application of hair or fibers within the mix further reinforces the structure of the plaster from within.
If you are dealing with a modern renovation, the cost of plastering services often includes the use of specialized beads. These metal or plastic strips are fixed to every external corner and join. They provide a rigid frame for the plasterer to work against and help distribute any impact or stress across a larger surface area. This significantly reduces the likelihood of edge-cracking or chipping over time.
Thickness plays a vital role in how the material behaves. If a coat is applied too thickly in one go, the weight of the wet material can cause it to sag and crack. Professional plasterers apply the material in two thin coats, allowing the first to “firm up” but not dry completely before the second is applied. This “wet-on-wet” technique creates a single, homogeneous layer that is much less prone to internal shrinkage.
Understanding plaster drying time
Patience is the most valuable tool for any homeowner. The plaster drying time varies based on the time of year and the thickness of the application. In the summer months, a standard skim coat might turn pink and ready for paint in as little as three days. In a damp or cold winter, this same process could take over a week. Never attempt to paint until the color is a uniform, light pink across the entire expanse.
Using a dehumidifier is a controversial topic among tradespeople. If used too early, they are far too aggressive and will pull moisture out of the surface while the core is still wet. This is a guaranteed way to cause cracks. If you must use one, wait at least forty-eight hours and keep it on the lowest possible setting. Natural evaporation assisted by a slight breeze is always the safer and more effective route.
For those interested in the technical details, our lime plaster guide explains the difference between the physical drying of gypsum and the chemical carbonation of lime. While gypsum dries relatively fast, lime continues to cure and harden for weeks or even months. Understanding these timelines helps you plan your decoration schedule without risking the finish of your project.
Once the plaster is dry, the final safeguard is the mist coat. This is a diluted version of your paint that soaks into the porous surface. It seals the plaster and provides a stable base for the full-strength paint. If you apply thick, undiluted paint to fresh plaster, it can pull on the surface as it dries, occasionally causing the top layer of the plaster to delaminate or show fine surface cracks.
Why background preparation is essential
The quality of the substrate often dictates the success of the finish. If there are loose bricks or crumbling mortar behind the scenes, the new plaster has nothing solid to grab onto. This lack of a bond eventually leads to “blown” sections that feel hollow when tapped. A thorough site survey by a professional plastering service near you will identify these issues before the wet work begins.
If you are over-boarding a ceiling, the screws must be driven in flush but not so deep that they break the paper face of the board. If the boards are loose or “springy,” they will move every time someone walks on the floor above. This movement will inevitably cause cracks along the joints of the boards. Using the correct amount of scrim tape and high-quality fixings is the only way to prevent this common ceiling issue.
In modern properties, the use of “bonding” as a base coat is common for deeper repairs. This material is designed to stick to high-suction surfaces like breeze blocks. If a plasterer tries to use a standard finishing coat for a deep fill, the material will shrink excessively. Using the correct product for each layer is a fundamental part of the trade that prevents almost all common cracking problems.
Every home has its own micro-climate. Kitchens and bathrooms are naturally more humid, which can slow down the drying process. Conversely, rooms with large south-facing windows can get very hot during the day. Keeping the curtains drawn on a hot day can protect a wet wall from the direct heat of the sun, which is often enough to cause rapid drying and subsequent cracking.
Finalizing the professional finish
Achieving a crack-free wall is about respect for the material and the environment. By following these guidelines, you ensure that the high-quality craftsmanship provided by our team remains in pristine condition. A smooth wall is the foundation of a beautiful home, and taking the time to let it dry correctly is the final step in a successful renovation.
Our team is dedicated to providing durable and beautiful finishes for every client. We understand the specific challenges of Gloucestershire architecture and use our local expertise to manage every project with care. If you want a plastering job that stands the test of time, choosing a team that understands the technical nuances of drying is essential.
Reach out to us if you have concerns about your current walls or are planning a new project. We can provide a detailed assessment and a transparent quote for your home improvements. Let us help you create a smooth, stable, and beautiful interior that you can be proud of for decades.
FAQ:
-
Are hairline cracks in new plaster normal?
Very fine “crazing” can occasionally happen if the room was slightly too warm, but these are usually easy to fill with a fine surface filler or a mist coat of paint.
-
Should I keep the heating on when the plasterer is working?
It is best to keep a low, consistent temperature. Do not turn the heating up high or point space heaters at the wet walls.
-
Why did my ceiling crack along the straight lines?
This usually indicates movement between the plasterboard sheets. Apply scrim tape and firmly fix the boards to the joists to prevent this.
-
Can I paint over a crack to hide it?
No, the paint will usually sink into the crack and make it more visible. You should fill the crack with a flexible filler once the plaster is fully dry.
-
How long should I wait before using a dehumidifier?
We recommend waiting at least 48 hours. Using one too early is the most common cause of avoidable shrinkage cracks.
-
Does the type of plaster affect cracking?
Yes, modern gypsum is more rigid and prone to cracking under structural movement, while traditional lime is more flexible and “self-healing.”
-
What is a mist coat and why is it important?
A mist coat is a watered-down paint that acts as a primer. It satisfies the suction of the new plaster and ensures the final paint bond is strong.